 Likes: 0
Results 1 to 1 of 1
Thread: Tutorial Compilation.
-
20-12-09, 12:50 PM #1
 Tutorial Compilation.
Register to remove this adThis tutorial will contain several reposts, of tutorials, made on this or other sites.
1.0 WoW Emulators.
1.1 Core Guides.
1.2 SQL Guides.
1.3 Lua Guides.
1.1
1.1.1 How To Compile C++ files.
Hello all! I am going to show you how to compile a Cpp script like a gossip, pvp scripts or etc... that goes with your Extra Scripts Folder.
First thing we do is download our SVN Source:
Arcemu SVN
Then we will go to:
Programs Needed:
Tortoise SVN
Visual C++ Express Edition 2008
Now you will need to put your .cpp script in the "ExtraScripts" folder, now we will go back until you see the "ExtraScripts2008" located in your "scripts" folder.Code:trunk > src > scripts > src > ExtraScripts
Double click it and click the + signs and everything should be open and now right click the "Scripts" folder while you're in the "ExtraScripts2008" Visual C++ and go to "Add" > "Existing Item" Like SO:
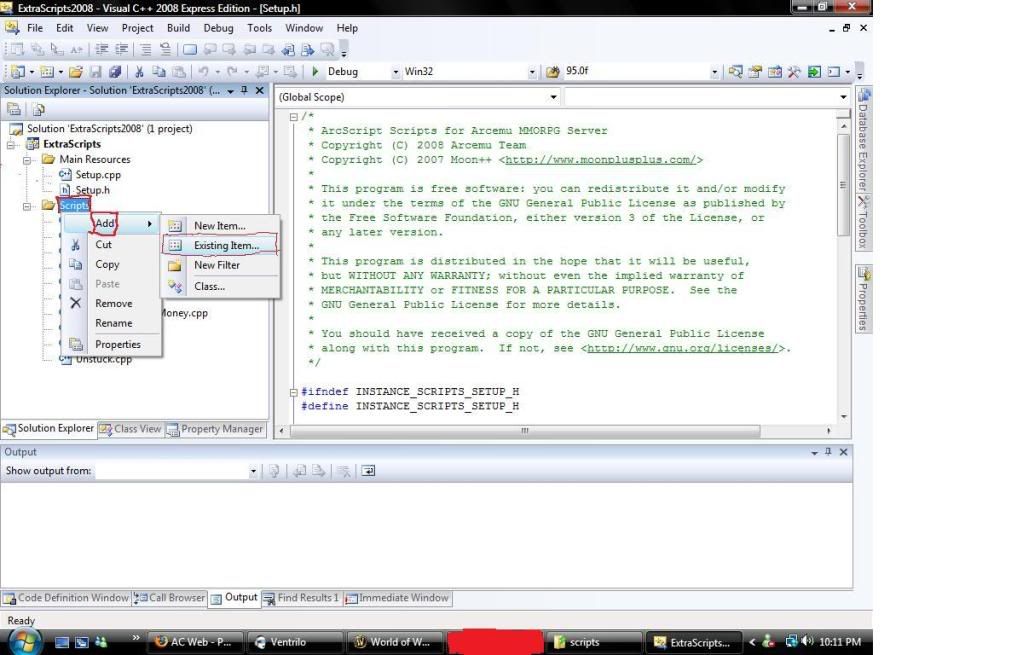
Now search your Folder that you download the SVN with and go to your ExtraScripts folder and ADD The script to the Visual C++, like so:
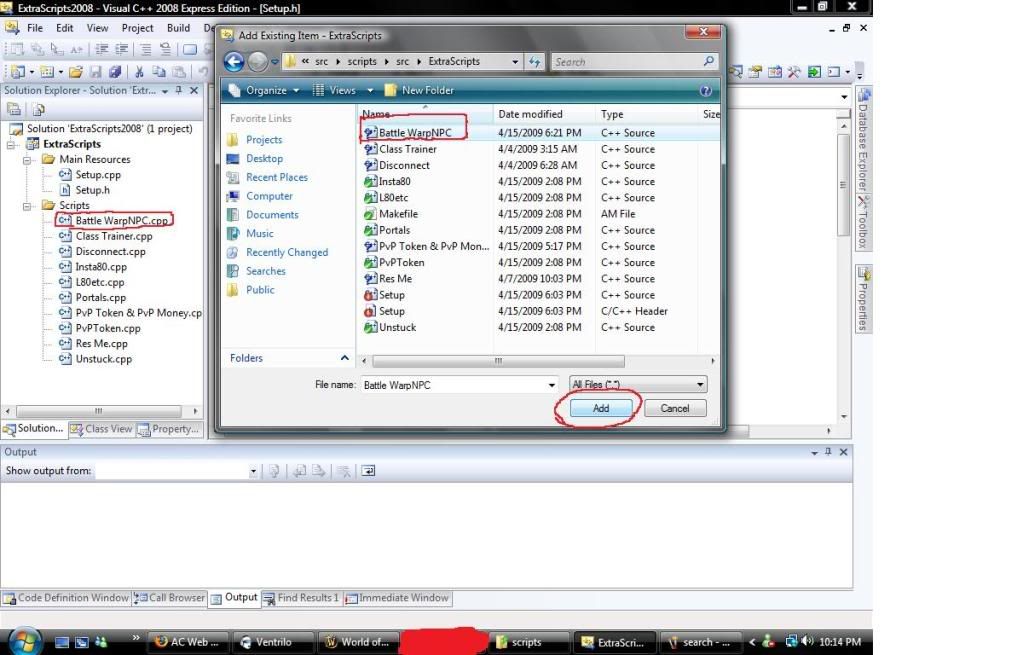
Now double click the script while it is in your Visual C++ and look down until you see the
Code:SetupYOURSCRIPTNAME(ScriptMgr * mgr)
Copy SetupYOURSCRIPTNAME and go to your setup.cpp in the "Main Resources" folder, you should see it in the pictures above and put this where mine is:
Picture:Code:SetupYOURSCRIPTNAME(mgr);
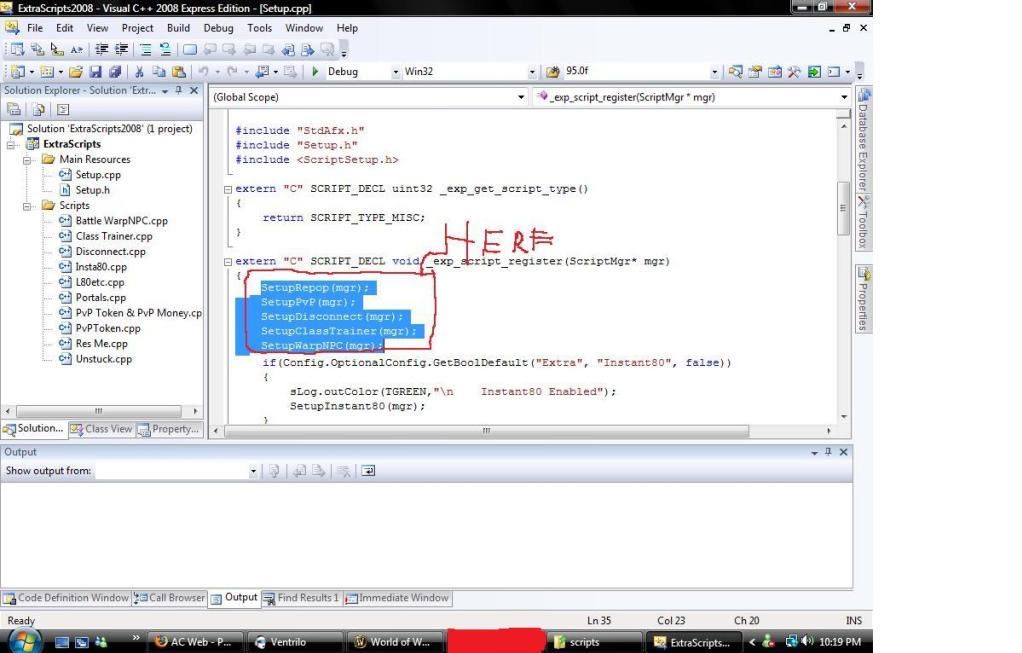
Now copy this in your script:
Code:void SetupYOURSCRIPTNAME(ScriptMgr * mgr)
Now paste it in the "Setup.h" as this:
Code:void SetupRepop(ScriptMgr * mgr);
Picture:
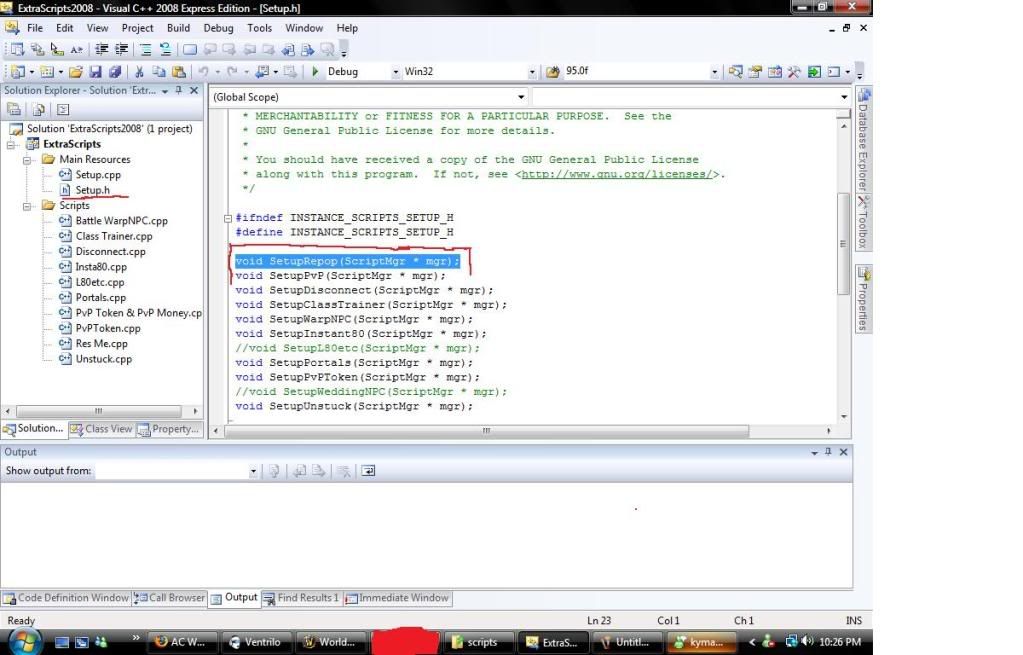
Now go all the way back to the start of that folder go to:
trunk > win > Double Click VC90 - All Projects and do the following:
Change it to "Release" instead of Debug and click build:
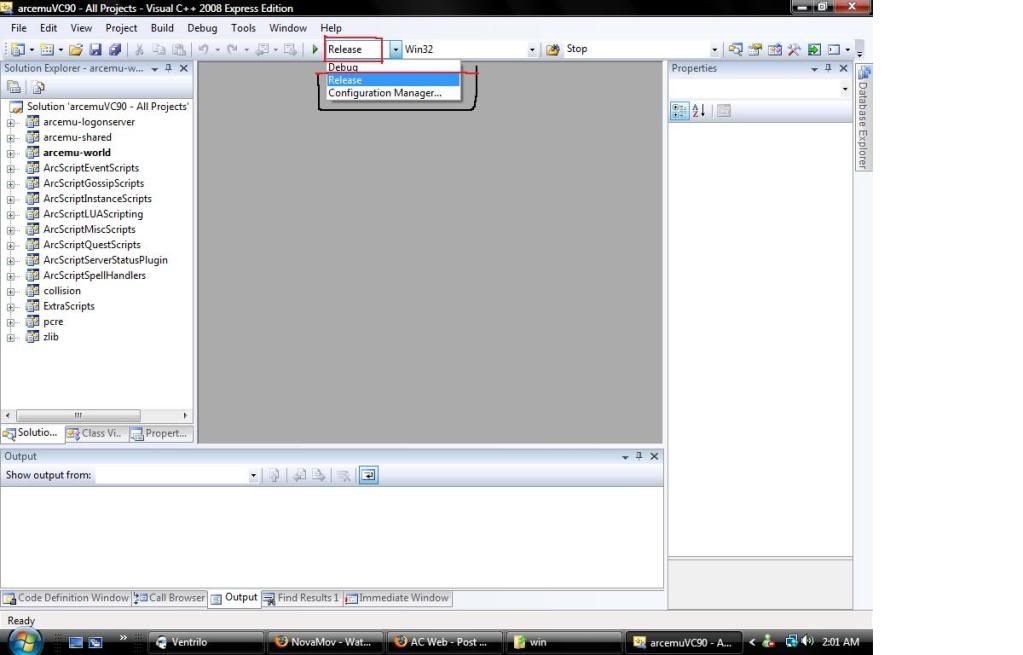
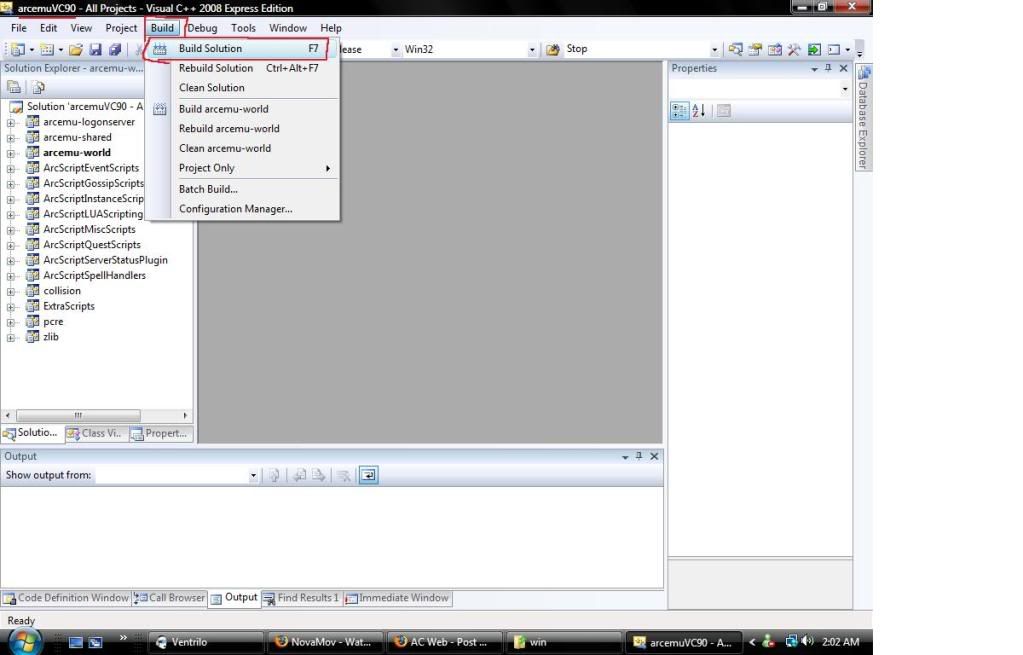
Now you're done! Thanks for reading.
1.1.2 Making a zone Sanctuary.
Hello everyone, I was searching so hard how to make a zone sanctuary, and I finnaly found a tutorial, and I want to share this guide with you guys! :P
Ok.
I will tell you step by step how to do that, so... Pay attention!
Step 1: You need an DBC Editor. You can download it from Here!
Step 2: Now, open DBC Editor. And there up, is a button called Open. Press on it, and open from your server, AreaTable.dbc with it.
The important column for us is the field4 column. Thats the PvP Flag Data.
~!:Important:!~ : - Another warning: Every map like Silithus is stored in little zones.
If you just change the Silithus ID, Silithus will be NoN - PvP but special zones like Cenarion Hold, Ok it is NoN - PvP but if it would be a PvP zone, would still allow pvp. So if you want to change a whole map you have to change every of it's zones. :!~
Step 3: Where you can find your Zone ID? Ok, go in-game, in the place where you want to make it Sanctuary, and if it's ArcEmu, type that in your chatbox: .GPS , and there will be some coords, and also ZoneID. Copy it and remember it.
Step 4: After you found the zone you want to change, next things aren't difficult anymore. In the zone's row you will see a value in the Field 4 row. Just change that value to 19496, that value doesn't allow any PvP and Duels are disable. If you want Duels to be allowed use 19456. Free for All is 17536.
Step 5: Now, just save and exit from DBC Editor. Now restart your server and, Voila! You'r done!
I'll post ZoneIds in another post, I hate 11000 Characters limits.
Ok, hope this was usefull.
1.1.3 Running 2 Realms on 1 PC.
1. Make a folder somewhere named realm2 or something. And copy your old emulator in there.
2. Delete your logonserve.exe and your logonserver.conf
3. Make a 2 new SQL databases using navicat or whatever you use. ( I'll be using world2 and character 1 as examples )
4. Name 1 of them world2 ( or whatever you wish ) and the second databse character1 ( or whatever you wish )
5. Execute the SQL's you originally executed on your older DB's.
6. Go to your realm2 emulator then open the world config file.
Then change this:
to this:Code:<WorldDatabase Hostname = "5.115.136.232" Username = "root" Password = "root" Name = "world" Port = "3306" Type = "1"> <CharacterDatabase Hostname = "5.115.136.232" Username = "root" Password = "root" Name ="logon" Port = "3306" Type = "1">
Now boot up your original server normally and then boot up the world.exe in your new emulator folder. And you should be all set.Code:<WorldDatabase Hostname = "5.115.136.232" Username = "root" Password = "root" Name = "world2" Port = "3306" Type = "1"> <CharacterDatabase Hostname = "5.115.136.232" Username = "root" Password = "root" Name = "character1" Port = "3306" Type = "1">
So whats happening here is that the second emulator connects to the original logonserver.exe for accounts but connects to the character1 DB for characters. Therefore you can use 1 account and create unique characters on both realms.
1.1.4 Making custom classes.
How To make Custom Class__________________________________________________ ______________
Hello! I am gonna show you how to make Custom Class! (Noob Easy)
1. Start Navicat or watever you use
2. Open your World Database
3. Find playercreateinfo Table
In Playercreateinfo you can find the most!
First Look at The "Race" and "Class" Columns , dont now what is what? then here are the ID's :
Race ID's:
Class ID's:Code:1 Human 2 Orc 3 Dwarf 4 Night Elf 5 Undead 6 Tauren 7 Gnome 8 Troll 10 Blood elf 11 Draenei
Remember you can make the custom class by using for example Draenei Shaman , then you are on race "11" class "7" . Now find the Column displayID on your Choosen Race+Class , in this column you can change how the race with the class looks , For Example if you put "18892" as DisplayID you will get a Broken Miner as Display .Code:1 Warrior 2 Paladin 3 Hunter 4 Rogue 5 Priest 7 Shaman 8 Mage 9 Warlock 11 Druid
4. Change your DisplayID on your Choosen Race+Class.
Now take a Look at the Base Columns , change them to watever you want the Custom Race+Class to start with .
5. Change the Base Columns.
6. Now for a Custom Starting Zone! ok , in Playercreateinfo you will find few columns called
MapID and Position X,Y and Z. ok,in game , type .gps in the place you want the custom race+class to start ,or whatevery Command you use to get the cordinates .
When you use the Command you will get Cordinates .
Now all you have to do is change the Starting zone with that cordinates by changind MapID and Position X,Y and > in PlayerCreateinfo
7. Now Leave Playercreateinfo Table and go to Playercreateinfo_spells
8. There search for your class ID and delete everything with that class
9. Now create new record .
10. Now change IndexID to your Class ID .
11. And then in SpellID type in the first spell that you want the custom class to start with .
Keep doing Records till you are done with Starting Spells on that custom class.
13. When you are done , Leave The Playercreateinfo_spells Table.
14. Now open Spells112 or watever the name is on yours spells Table,
15. Then Create Spells for your Custom Class and add them to trainers by using the command .addtrainerspell or use .commands to se what you can use...
P.S: Remember you can change the most with the PlayerCreateinfo_ Tables! Even Starting Items!
1.1.5 Removing Powered By ArcEmu.
OK , this is how to remove "Powered By ArcEmu" message when character logs in
1. Open \src\arcemu-world\CharacterHandler.cpp
2. Remove or replace these lines
Code:#ifdef WIN32 _player->BroadcastMessage("Powered by: %sArcEmu %s r%u/%s-Win-%s %s(Please report ALL bugs to http://ArcEmu.org/forums/)", MSG_COLOR_WHITE, BUILD_TAG, BUILD_REVISION, CONFIG, ARCH, MSG_COLOR_LIGHTBLUE); #else _player->BroadcastMessage("Powered by: %sArcEmu %s r%u/%s-%s %s(Please report ALL bugs to ArcEmu.org/forums/)", MSG_COLOR_WHITE, BUILD_TAG, BUILD_REVISION, PLATFORM_TEXT, ARCH, MSG_COLOR_LIGHTBLUE); #endif
1.2 SQL tutorials.
1.2.1 Making Custom Gm ranks.
Hi everyone!
This is my guide on how to create custom GM ranks...
Custom GM ranks can be extremely useful for all GM private servers (so people don't continuously spawn NPCs and GOs), donation rewards, and all other private servers (to ensure that the GMs you recruit don't go spawning random stuff, teleporting randomly, and being overall noobs).
First up we'll create a GM rank for a Blizz-like private server. Lets say that you're starting to recruit new GMs and you don't want noobs, so we'll create a custom GM rank.
Firstly, open up your database editor, open up your connection, then the database 'world'. Now, head into the table called 'command_overrides'. In the left hand column type the first command you want your GM rank to have. To do this just type the full command without the dot. I will use 'recall'. Now in the right hand column type a letter (NOT A or Z). I will use the letter 'g'. That means that so far your GM rank has one command, however, it has no subcommands. To add subcommands make a new entry, in the left hand column type the subcommand. The subcommand I would like to add is 'recall port'. Then in the right hand column I will put 'g'.
So far mine looks like this:
Continue adding commands like that until you think you've added all you need.Code:recall g recall port g
In the end, mine looked like this:
Execute that code into your database and voila! A custom GM rank which will reduce noob GMs mucking around by a lot!Code:INSERT INTO command_overrides (`command_name`, `access_level`) VALUES ('recall', 'g'); INSERT INTO command_overrides (`command_name`, `access_level`) VALUES ('recall port', 'g'); INSERT INTO command_overrides (`command_name`, `access_level`) VALUES ('recall list', 'g'); INSERT INTO command_overrides (`command_name`, `access_level`) VALUES ('gmticket getID', 'g'); INSERT INTO command_overrides (`command_name`, `access_level`) VALUES ('gmticket delID', 'g'); INSERT INTO command_overrides (`command_name`, `access_level`) VALUES ('gmticket remove', 'g'); INSERT INTO command_overrides (`command_name`, `access_level`) VALUES ('gmticket toggle', 'g'); INSERT INTO command_overrides (`command_name`, `access_level`) VALUES ('gmticket getID', 'g'); INSERT INTO command_overrides (`command_name`, `access_level`) VALUES ('gmticket', 'g'); INSERT INTO command_overrides (`command_name`, `access_level`) VALUES ('gmticket get', 'g'); INSERT INTO command_overrides (`command_name`, `access_level`) VALUES ('summon', 'g'); INSERT INTO command_overrides (`command_name`, `access_level`) VALUES ('commands', 'g'); INSERT INTO command_overrides (`command_name`, `access_level`) VALUES ('ban char', 'g'); INSERT INTO command_overrides (`command_name`, `access_level`) VALUES ('unban char', 'g'); INSERT INTO command_overrides (`command_name`, `access_level`) VALUES ('kick', 'g'); INSERT INTO command_overrides (`command_name`, `access_level`) VALUES ('revive', 'g'); INSERT INTO command_overrides (`command_name`, `access_level`) VALUES ('reviveplr', 'g'); INSERT INTO command_overrides (`command_name`, `access_level`) VALUES ('server saveall', 'g'); INSERT INTO command_overrides (`command_name`, `access_level`) VALUES ('help', 'g'); INSERT INTO command_overrides (`command_name`, `access_level`) VALUES ('appear', 'g'); INSERT INTO command_overrides (`command_name`, `access_level`) VALUES ('gm list', 'g'); INSERT INTO command_overrides (`command_name`, `access_level`) VALUES ('gm on', 'g'); INSERT INTO command_overrides (`command_name`, `access_level`) VALUES ('gm off', 'g'); INSERT INTO command_overrides (`command_name`, `access_level`) VALUES ('invisible', 'g'); INSERT INTO command_overrides (`command_name`, `access_level`) VALUES ('char learn', 'g'); INSERT INTO command_overrides (`command_name`, `access_level`) VALUES ('char unlearn', 'g'); INSERT INTO command_overrides (`command_name`, `access_level`) VALUES ('char learnskill', 'g'); INSERT INTO command_overrides (`command_name`, `access_level`) VALUES ('char additem', 'g'); INSERT INTO command_overrides (`command_name`, `access_level`) VALUES ('char removeitem', 'g'); INSERT INTO command_overrides (`command_name`, `access_level`) VALUES ('playerinfo', 'g'); INSERT INTO command_overrides (`command_name`, `access_level`) VALUES ('paralyze', 'g'); INSERT INTO command_overrides (`command_name`, `access_level`) VALUES ('unparalyze', 'g'); INSERT INTO command_overrides (`command_name`, `access_level`) VALUES ('gm blockwhispers, 'g'); INSERT INTO command_overrides (`command_name`, `access_level`) VALUES ('gm allowwhispers', 'g'); INSERT INTO command_overrides (`command_name`, `access_level`) VALUES ('kick byplayer', 'g'); INSERT INTO command_overrides (`command_name`, `access_level`) VALUES ('kick byaccount', 'g'); INSERT INTO command_overrides (`command_name`, `access_level`) VALUES ('ban ip', 'g'); INSERT INTO command_overrides (`command_name`, `access_level`) VALUES ('unban ip', 'g'); INSERT INTO command_overrides (`command_name`, `access_level`) VALUES ('lookup item', 'g'); INSERT INTO command_overrides (`command_name`, `access_level`) VALUES ('lookup skill', 'g'); INSERT INTO command_overrides (`command_name`, `access_level`) VALUES ('lookup spell', 'g'); INSERT INTO command_overrides (`command_name`, `access_level`) VALUES ('char forcerename', 'g'); INSERT INTO command_overrides (`command_name`, `access_level`) VALUES ('gmannounce', 'g'); INSERT INTO command_overrides (`command_name`, `access_level`) VALUES ('announce', 'g'); INSERT INTO command_overrides (`command_name`, `access_level`) VALUES ('ban account', 'g');
On all GM servers, usually you can donate for more GM commands. I have made a custom rank that would be good for players to start with on an all GM server. Here it is:
And then a suggestion for a donor rank is the following (you probably should modify it if you want a .gobject donation pack and .npc and so on...):Code:INSERT INTO command_overrides (`command_name`, `access_level`) VALUES ('commands', 'p'); INSERT INTO command_overrides (`command_name`, `access_level`) VALUES ('gps', 'p'); INSERT INTO command_overrides (`command_name`, `access_level`) VALUES ('worldport', 'p'); INSERT INTO command_overrides (`command_name`, `access_level`) VALUES ('cheat', 'p'); INSERT INTO command_overrides (`command_name`, `access_level`) VALUES ('cheat god', 'p'); INSERT INTO command_overrides (`command_name`, `access_level`) VALUES ('cheat fly', 'p'); INSERT INTO command_overrides (`command_name`, `access_level`) VALUES ('character', 'p'); INSERT INTO command_overrides (`command_name`, `access_level`) VALUES ('character additem', 'p'); INSERT INTO command_overrides (`command_name`, `access_level`) VALUES ('character removeitem', 'p'); INSERT INTO command_overrides (`command_name`, `access_level`) VALUES ('character repair', 'p'); INSERT INTO command_overrides (`command_name`, `access_level`) VALUES ('lookup', 'p'); INSERT INTO command_overrides (`command_name`, `access_level`) VALUES ('lookup item', 'p'); INSERT INTO command_overrides (`command_name`, `access_level`) VALUES ('lookup spell', 'p'); INSERT INTO command_overrides (`command_name`, `access_level`) VALUES ('modify', 'p'); INSERT INTO command_overrides (`command_name`, `access_level`) VALUES ('modify level', 'p'); INSERT INTO command_overrides (`command_name`, `access_level`) VALUES ('modify displayid', 'p'); INSERT INTO command_overrides (`command_name`, `access_level`) VALUES ('recall', 'p'); INSERT INTO command_overrides (`command_name`, `access_level`) VALUES ('recall port', 'p'); INSERT INTO command_overrides (`command_name`, `access_level`) VALUES ('recall list', 'p');
Execute that into your DB and you have a donor GM rank.Code:INSERT INTO command_overrides (`command_name`, `access_level`) VALUES ('recall add', 'd'); INSERT INTO command_overrides (`command_name`, `access_level`) VALUES ('gobject', 'd'); INSERT INTO command_overrides (`command_name`, `access_level`) VALUES ('gobject spawn', 'd'); INSERT INTO command_overrides (`command_name`, `access_level`) VALUES ('gobject select', 'd'); INSERT INTO command_overrides (`command_name`, `access_level`) VALUES ('gobject delete', 'd'); INSERT INTO command_overrides (`command_name`, `access_level`) VALUES ('npc', 'd'); INSERT INTO command_overrides (`command_name`, `access_level`) VALUES ('npc spawn', 'd'); INSERT INTO command_overrides (`command_name`, `access_level`) VALUES ('npc select', 'd'); INSERT INTO command_overrides (`command_name`, `access_level`) VALUES ('npc select', 'd'); INSERT INTO command_overrides (`command_name`, `access_level`) VALUES ('lookup object', 'd'); INSERT INTO command_overrides (`command_name`, `access_level`) VALUES ('lookup creature', 'd'); INSERT INTO command_overrides (`command_name`, `access_level`) VALUES ('modify speed', 'd');
To make an account a certain rank go into the database 'characters' then go into the table 'account_names'. Find the account name and scroll sideways until you find the column that says 'gm'. In that column type the letter that your custom GM rank is...
Note: If you want to make a player a donor rank, using my example you would set their 'gm' to 'pd' or 'dp'. That means that the account has the player and the donor commands!
I hope my guide helped some people. And good luck if you use this for your server! Oh yeah, and tell me if I made a mistake or if you have any questions.
1.2.2 Making a good starting zone.
Greetings Ac-webians. Today I am going to show you how to make a good custom starting area. This is sort of the equivalent of Northshire to Goldshire.
Right, let's get started.
What You Will Need
You will need a WoW-V account.
A Working Private Server, you can use a repack.
HeidiSQL.
A Good Creative Mind.
A Nice place for a starting zone.
Right, first of all, create a folder in your documents or something. Like My Documents/Private Server SQL's/Alliance Starter Zone --- link to a video i made: [ame=http://www.youtube.com/watch?v=fFbPM6AEYOU]YouTube - WoWPS Making and Organizing your SQL Root Folders[/ame]
Or something similar.
Step One: Getting your start zone empty.
Go to your database and start deleting all of the NPC Spawns that are in the zone that you want to make as your start zone. If you are making a completely custom server you should have done this already, and deleted all of the NPC's from the DB.
Step Two: Making your NPC's.
Go to WoW-V. Log into your account and then go to the NPC creator. Start making your NPC's, you could maybe do a refugee storyline, which usually means making a new faction in your DB and then making some low level NPC's in that faction
Step Three: Items!
Usually, you get items from killing mobs and as quest rewards, so you need to make some. Think of the storyline you are going for and then make some related to that story. For example if you are making a 1-10 zone with a cool refugee story, you wouldn't get f**king awesome looking gear with UBER 1337 stats, would you? Think.
Step Four: Add some quests.
Like the step's title says, you need to make some quests. These quests will provide some amazing story feeling to the zone. Make some quests that you feel that would go with the NPC's and Items you made. For example, you wouldn't get a level 255 Elite asking you to go kill a level 1 boar would ya? You probably would already have an idea of what you are going to do.
Step Five: Reading up.
Right, imagine, you are in a wizard's sanctum, what is the one thing you would notice first?
BOOKS! That's right, books. Not much of a BIG need in the zone, but it helps by giving the players something to do, and another thing to do for quests, but only if you are really good.
Step Six: Database Nerds!
You've got your SQL's downloaded from WoW-V now. So next you need to add the SQL's to your DB.
Fire up MySQL and then your DB. I prefer to use HeidiSQL because of it's clean interface. Go to 'open SQL query' and then start adding the SQL's to your DB. This shouldn't take too long, but it depends on how many SQL's you have made.
Step Seven: Starting in your new zone!
Whats a custom starting area if you don't start in it? To do this, go to your database, and then playercreateinfo (different in mangos i think), and then you need to go ingame and type .gps at the exact point you want the players to start at. Search on the forums for a guide like this as it is really complex and I'm not that great at explaining it
Step Eight: Finally In-Game. What now?
Right. So you have added the SQL's to your server. So, start up your world and logonserver (arcemu) or mangosd and realmd (MaNGOS) and then log in. Get to your starting zone and start spawning your NPC's and then try doing the quests and stuff to check if it all works. If it does, you have successfully made a basic start area! But what next?
Step Nine: Making your creatures do stuff!
Awesome. You have everything spawned, tested and approved. But! You're zone still looks a bit bland eh? Sometimes it is the NPC's that make the zone look a bit simple. So what you can now do is start adding waypoints to SOME of your NPC's, and the others you can make them do emotes. Like, making a night elf huntress on a hill kneel? Yeah, this will make it look cooler.
Step Ten: Objects.
Check you out! Now that you've added some NPC actions it is looking muuuuch better. But some things are still missing. Go on! Hazard a guess.
That's right, Game Objects, things like fires, wagons, houses and stuff. So. Have a look, and have a think. What would look good? Some things that will make the player think "WOW!" are things like auras where a new player starts and fires around a platform. I can guarantee that this will make your server rock!
Step Eleven: Are we finished?
We have finally finished! Now you have an awesome starting area. It may have taken you a while, but, if you spend a LOOOONGGG time on it, ALL of your hard work will pay off. Your player base will grow very quickly if you get people to vote. Advertise your server at here on AC, start a good site and keep your server updated, adding new content every day. Before long you will have 500+ players on there!!
Have Fun! I hope you enjoyed this guide as much as I did making it.
I wish you and your server good luck, and if you feel like anything should be added to this guide, please tell me and I will consider it.
=)
1.2.3 Quest sorts.
I decided to release a little list but that list can be useful for some people!
It's all listed with the name in WoW Files.
Quests Sorts List:
1. Epic
21. Old Wailing Cavern
22. Seasonal
23. Old Undercity One
24. Herbalism
25. Old Scarlet Monastery
41. Old Uldaman
61. Warlock
81. Warrior
82. Shaman
101. Fishing
121. Blacksmithing
141. Paladin
161. Mage
162. Rogue
181. Alchemy
182. Leatherworking
201. Engineering
221. Tresure Map
241. Old Sunken Temple
261. Hunter
262. Priest
263. Druid
264. Tailoring
284. Special
304. Cooking
324. First Aid
344. Legendary
364. Darkmoon Faire
365. Ahn'Qiraj War
366. Lunar Festival
367. Reputation
368. Invasion
369. Midsummer
Quest Infos List:
1. Elite
21. Life
41. PvP
62. Raid
81. Dungeon
82. World Event
83. Legendary
84. Escort
Credits go to : Alvanaar, QQrofl, Brutix, Gnoppy, Me, Xyoleus.
› See More: Tutorial Compilation.


 Reply With Quote


