 Likes: 0
Results 1 to 10 of 12
-
05-04-10, 10:59 AM #1
 [Release] Guide to a public server non-hamichi 100% working
Register to remove this adfirst I know this was posted here already "by me" my account got hacked or something cause I can not get into hence forth I am moving my guide to an account in which I can moderate the guide on. If theres a problem you can delete the old topic or delete the old account "NOT this one please" Anyway I hope you enjoy again..haha
How to Make Your Server Public Without Hamachi. (THIS GUIDE ACTUALLY WORKS)
SOME INFO
Im tired of guids being posted that only show parts of what needs to be done. some guides will show you just change the realm.cofig there will be about 10k views and about 500 coments with people needing help. Not with this one it is as well put as can be and you will be sure to get it public with this guide
NEXT
Step 1 part one) Sign Up: DNS Service.
Goto DynDNS: Dynamic DNS, E-Mail Delivery and Other Services and sign up for an account. Verify the account by checking the email and clicking the link.

Follow directions on image
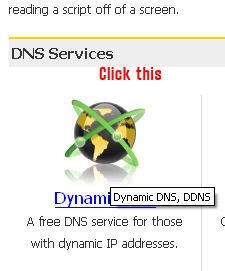
Follow directions on image
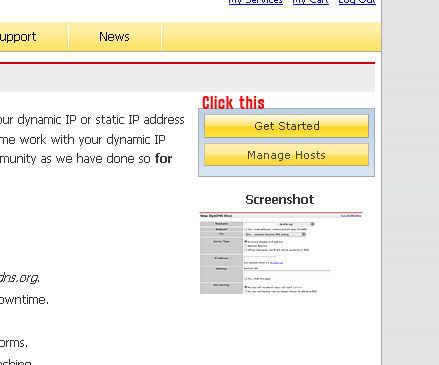
Follow directions on image
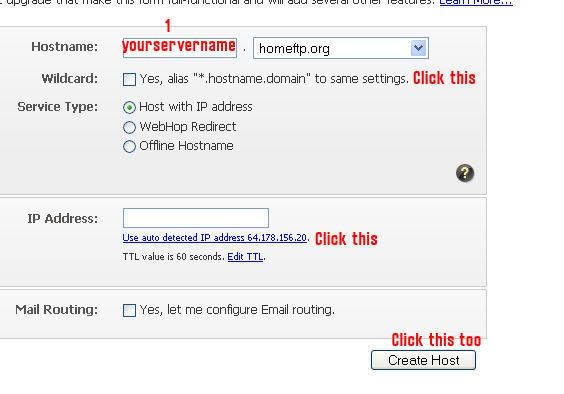
Follow directions on image
Hostname: this is the realmlist players will use to connect to you, and also what you use to forward some information in your config files.
This is your DNS SERVER
NEXT
Step 1 part two) get aPen and a peace of Paper: To Write this down
Write down the DNS server you made in step 1a).
Write down 127.0.0.1
Write down 0.0.0.0
Now open up a command promt (Windows key + r) (cmd) and type
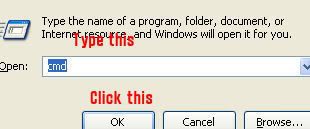
ipconfig/all

This will list a bunch of connections, and their protocols.
You are looking for this:

Your NUMBERS should look different, but they are in the SAME AREA.
WRITE THEM DOWN!!.
NEXT
Step 1 part three) IP ADDY
IP Chicken - Whats my IP address? ip address lookup

So by now you should have 3 sets of numbers written down and the DNS Server.
To make it simple for the rest of this guide, we will name the numbers you wrote down
127.0.0.1 = localIP (not needed YET in this guide, may edit later)
192.168.1.x = routerIP (3 on the pic)
192.168.1.X = MYIP (2 on the pic)
(value from chickenIP) =ChickenIP
DNSSERVER = DNSRV
Step 2 part 1) PORT FORWARDING
LOMG!!!!
In your address bar type the value you wrote down that was DEFAULT GATEWAY.
The login/password information should be one of these combinations. IF non of these work, press and hold the RESET button on your ROUTER for 30 seconds until it resets. Usually the POWER light will start blinking and then go steady again.
Login Pass
Admin Admin <-- most of the time.
Admin (none)
(none) (none)
(Admin) (password)
Now, find out by looking around and clicking links on how to PORT FORWARD. Mine was under a tab called Applications and Gaming.
Forward the ports shown in the below image.
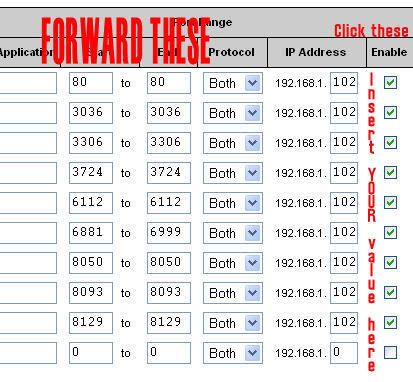
Make the protocol selection BOTH. If you don’t have a choice, leave it blank, this usually also does TCP/UDP.
NEXT
Step 2 part 2) Hosts File
Goto
C:\WINDOWS\system32\drivers\etc
And open the file
Hosts

Now you need to write THREE THINGS!!
127.0.0.1 yourservername.hostnameyouchose
Router IP yourservername.hostnameyouchose
CHICKENIP yourservername.hostnameyouchose
It should look similar to this ^
Code: to show which goes with which this is not the corret format below u must substitute you dns host name and ips in.
127.0.0.1 gmtricks.servegame.org
192.168.1.1 gmtricks.servegame.org
64.178.156.20 gmtricks.servegame.org
SAVE AND EXIT.
NEXT
Step 3 part one) Config Files
Go into your ascent folder and open your 3 config files (realms, logon, world)
World:
#-#-#-#-#-#-#-#-#-#-#-#-#-#-#-#-#-#-#-#-#-#-#-#-#-#-#-#-#-#-#-#-#-
<WorldDatabase Hostname = "DNSSVR" Username = "root" Password = "****" Name = "world" Port = "3306" Type = "1">
<CharacterDatabase Hostname = "lDNSSVR" Username = "root" Password = "****" Name = "world" Port = "3306" Type = "1">
logon
<LogonDatabase Hostname = "DNSSVR"
Username = "root"
Password = "edwin"
Name = "world"
Port = "3306"
Type = "1">
change these to your chicken ip
AllowedIPs = "127.0.0.1/32"
AllowedModIPs = "127.0.0.1/32">
realm
<Realm1 Name = "Your Realm Name" Address = "DNSVR:8129" Icon = "Normal" Colour = "1" Population = "1.0" TimeZone = "1">
YOU NEED THE :8129
make this your dnsaname also
<Realm1 Name = "Middle Earth"
Address = "DNSSVR:8129"
Icon = "PVP"
Colour = "1"
Population = "0"
TimeZone = "1">
<Realm2 Name = "Middle Earth"
Address = "DNSSVR:8129"
Icon = "PVP"
Colour = "1"
Population = "0"
TimeZone = "1">Code:
NEXT
Step 3 part 2) seting the Realmlist
Now you open your realmlist.wtf file and input this
Code:
set realmlist DNSSVR
ex set realmlist make it your DNSSVR
updates made to accommodate the recent patches!
› See More: [Release] Guide to a public server non-hamichi 100% workingLast edited by Glory; 05-04-10 at 11:44 AM.

-
05-04-10, 11:20 AM #2
Who made it ? :]
Last edited by Dimman; 08-08-10 at 10:20 AM.
No touching please.
-
05-04-10, 11:43 AM #3
-
20-04-10, 05:00 PM #4
-
22-04-10, 03:19 PM #5
I have seen this posted like 400 times on here, Ac-Web and *******. I'm just thinking that if this guide is so rapidly posted. Why try and make a new one? I am sorry but this shouldn't be + rep because it looks stolen and simple to do. Sorry But I don't like this.
Don't Forget to for useful releases!. It gives you good luck! Just Like Lucky charms!
-
08-08-10, 10:20 AM #6
Useful thread stickied!
No touching please.
-
08-08-10, 11:58 AM #7
There is way to many of these "guides"... pretty much every one of them is copied from another, which has been copied from someone else, which was also copied.
-
08-08-10, 12:13 PM #8
Well thats why im only sticking one of them.
No touching please.
-
29-08-10, 04:53 PM #9
Friend can you make one like this but with the Trinity Core Repack...? because i´m using a LAN (i don´t want to go online server) and i can´t connect to the server from other computers...only the one where the server is can...
Can you help me please...?
I´m using Zellcorp´s GM and Blizz repack just for you to know
-
24-10-10, 05:40 PM #10
Register to remove this adsure thing Narc.
and yes I am project anthrax, I have also posted this on various sites and have various names on different forums =p
and thanks for the sticky
Related Threads - Scroll Down after related threads if you are only interested to view replies for above post/thread
Visitors found this page by searching for:
Nobody landed on this page from a search engine, yet!
SEO Blog


 Reply With Quote


